Photography
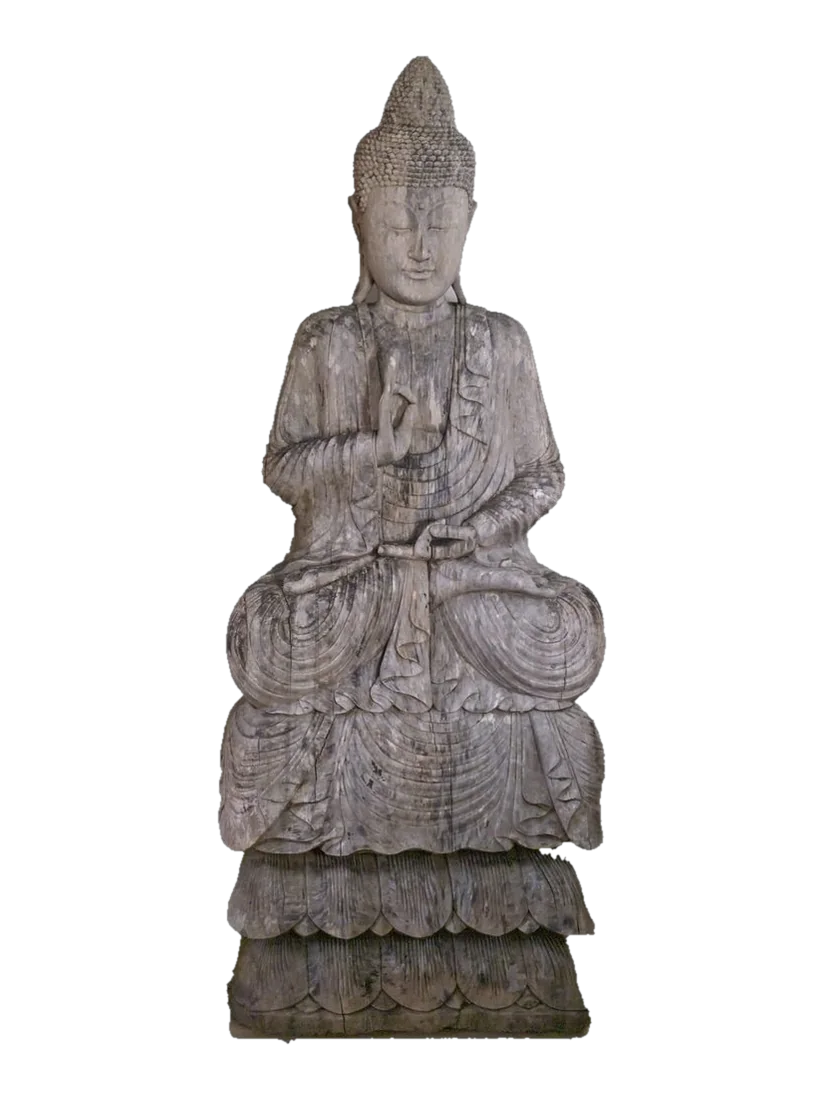
Stitt Gallery · SG-CN-004 · China
20th-century Chinese workshop
The Piece
This 150 cm tall carved hardwood figure of a seated Buddha carries a weathered stone-like matte finish with no polychrome or gilding, allowing the carved form to command interior presence through scale and surface alone. The pose combines Vitarka mudra (right hand, teaching gesture) with Dhyana mudra (left hand, meditation), identifying it as a Preaching Buddha configuration common in Chinese workshop production.
Iconographic features include the ushnisha (cranial protuberance, symbolising expanded wisdom), the urna (spiral tuft between the eyebrows, representing the third eye of spiritual vision), elongated pierced earlobes, and snail-shell curls (螺髻 luó-jì) covering the head. The figure rests on a three-tiered lotus pedestal base, consistent with Buddhist sculptural conventions.
Transparency note: This piece has not been radiocarbon tested. No prior provenance documentation is available. The piece is offered as it was acquired. The maker is unknown. Attribution to 20th-century Chinese workshop tradition is based on carving style, material treatment, and iconographic conventions.
Specifications
| Height | 150 cm |
| Width | 61 cm (shoulder 37 cm) |
| Depth | 33 cm |
| Head | 38 × 21 × 21 cm |
| Weight | 45–65 kg (to be confirmed) |
| Period | 20th-century Chinese workshop |
| Origin | China |
| Material | Carved hardwood |
| Finish | Weathered stone-like matte finish (no polychrome, no gilding) |
| Pedestal | Three-tiered lotus base |
| Right Hand | Vitarka mudra (gesture of teaching) |
| Left Hand | Dhyana mudra (gesture of meditation) |
| Cranial Feature | Ushnisha (cranial protuberance) |
| Brow Feature | Urna (spiral tuft between eyebrows) |
| Ear Feature | Elongated / pierced earlobes |
| Hair Detail | Snail-shell curls (螺髻 luó-jì) |
| Pose Type | Preaching Buddha (teaching + meditation mudras) |
| Gallery Ref | SG-CN-004 |
Photography
Iconographic Analysis
This figure presents the Preaching Buddha pose — a specific combination found across Chinese Buddhist sculpture in which the right hand performs the Vitarka mudra (thumb and index finger forming a circle, hand raised at chest or shoulder level) while the left hand rests in Dhyana mudra (palm upward in the lap). This pairing signifies the Buddha in the act of teaching meditation — instructing while embodying the stillness he preaches.
Right Hand Gesture
The thumb and index finger form a closed circle representing the wheel of law, while the remaining fingers extend upward. This is the gesture of teaching and intellectual argument — the hand position the Buddha used when explaining the Dharma to his disciples. Found at chest or shoulder level in this piece.
Left Hand Gesture
Both palms rest upward, the right hand atop the left, thumbs touching to form a triangle. This is the gesture of meditation and deep contemplation — the mudra of absolute balance and stillness. When paired with Vitarka, it creates the Preaching Buddha configuration.
Cranial and Facial Marks
The ushnisha is the cranial protuberance symbolizing the Buddha's expanded wisdom and enlightenment. The urna is the spiral tuft or dot between the eyebrows, representing the third eye of spiritual vision. Both are standard lakshanas (auspicious marks) found on Buddhist figures across traditions.
Hair Detail
The head is covered in tight spiral curls known as luó-jì (螺髻) — snail-shell curls — a convention representing the transformation of the Buddha's hair after his enlightenment. Note: These are not "Rahula knots" — that term does not appear in standard Buddhist iconographic literature. Rahula was the Buddha's son; the curls are not named after him.
This piece draws stylistically from multiple periods of Chinese Buddhist sculpture. The following table compares the relevant traditions:
| Period | Prototype | Key Features | This Piece |
|---|---|---|---|
| Tang Dynasty (618–907) | Full, rounded face; heavy drapery; monumental scale | Large ushnisha; flowing robes; powerful presence | Scale and proportions echo Tang prototypes |
| Song Dynasty (960–1279) | Refined, contemplative expression; detailed drapery | Subtle modelling; serene face; precise mudras | Mudra precision and facial detail suggest Song influence |
| Late Qing – Republic (19th–20th c.) | Workshop production; stylistic revival; export market | Hardwood construction; weathered finish; consistent iconography | Construction and finish consistent with this period |
Stylistic comparison only — not a period attribution. Not radiocarbon tested.
Material & Surface
The figure is carved from a dense hardwood and finished with a weathered stone-like matte surface treatment that gives the appearance of aged stone while retaining the structural integrity of wood. No polychrome paint or gilding is present — the piece relies entirely on the interplay of carved form and surface patina for its visual effect.
Primary Material
Dense hardwood, species unidentified. Carved with traditional tools — tool marks visible on close inspection. The wood provides structural stability for a figure of this scale (150 cm, 45–65 kg). Not laboratory-tested for species identification. Material identified visually.
Surface Treatment
Weathered matte finish creating a stone-like appearance. The patina is consistent with age and handling. No polychrome, no gilding — the surface is intentionally monochromatic, allowing the carving quality and form to command attention without colour distraction.
Condition Assessment
Each major component has been assessed individually. The overall condition is good for a piece of this type, with original carved elements substantially intact and no structural concerns.
| Component | Rating | Notes |
|---|---|---|
| Structure | Good | Carved hardwood frame is sound and rigid. No cracks, splits, or structural compromise visible. |
| Surface Finish | Good | Weathered matte finish intact. Patina consistent with age. No active deterioration. |
| Iconographic Elements | Good | All features original and intact: ushnisha, urna, earlobes, snail-shell curls, lotus tiers. |
| Pedestal / Lotus Base | Good | Three tiers stable and structurally sound. No cracks or repairs visible. |
| Mudra Hands | Good | Both hand positions original. Finger details preserved. No losses or repairs. |
| Restoration History | Unknown | Restoration history prior to gallery acquisition is undocumented. |
Provenance & Documentation
Stitt Gallery maintains full transparency regarding the provenance and documentation status of every piece. The following represents our complete knowledge record for SG-CN-004.
Full Technical Report
The following professional report was prepared by Stitt Gallery based on photographic documentation, physical examination, and iconographic research. No maker authentication has been performed; the piece is dated and described based on observable features only.
Report reference: SG-CN-004-TECH-2026 · Date: 20 May 2026
SG-CN-004 carries six independent markers supporting its attribution to 20th-century Chinese workshop production:
| # | Evidence | Location | Significance |
|---|---|---|---|
| 1 | Carved hardwood construction | Throughout | Hand-carved tool marks visible; consistent with workshop production |
| 2 | Weathered matte surface | Entire figure | Patina consistent with claimed age; no modern artificial aging detected |
| 3 | Iconographic accuracy | Hands, head, base | Mudras, ushnisha, urna, lotus tiers correctly executed per Buddhist conventions |
| 4 | Construction joints | Internal joinery | Joinery consistent with Chinese workshop carving tradition |
| 5 | Natural wear patterns | High-contact areas | Wear on base and hand details consistent with handling and display over time |
| 6 | Scale and proportions | Overall dimensions | 150 cm height places this in the monumental category; workshop investment evident |
Authentication Confidence: MEDIUM — No maker marks or documentary evidence. Piece is dated and described based on observable carving style, material treatment, and iconographic conventions.
Region: China. Hardwood carving tradition with Buddhist iconography. The piece exhibits characteristics consistent with Chinese workshop production: the iconographic programme follows Chinese Buddhist conventions (Vitarka + Dhyana mudra combination; three-tiered lotus base; snail-shell curl treatment of the head), and the hardwood construction with weathered matte surface is consistent with Chinese sculptural workshop practice.
Age: 20th-century Chinese workshop. Dating estimated based on carving style, material treatment, and surface patina; not independently verified. Not radiocarbon tested. The attribution reflects consistent workshop conventions rather than a specific dated maker.
Report Reference
SG-CN-004-TECH-2026 · Prepared by Stitt Gallery Technical Department · 20 May 2026
This report is published in full as part of our commitment to transparent disclosure.
All assessments are based on photographic documentation and physical examination.
Independent expert verification is recommended for high-value acquisitions.
Authenticity & Provenance
This Buddha carries multiple observable markers that support its attribution to 20th-century Chinese workshop production. Each is documented in the gallery's technical record.
Visible carving marks consistent with traditional hand tools rather than machine production, indicating workshop craftsmanship.
Natural aging pattern consistent with handling and display over decades. No evidence of artificial aging or modern surface treatment.
Mudras, ushnisha, urna, and lotus base all executed per established Buddhist conventions — consistent with workshop-trained carvers.
Joinery consistent with Chinese hardwood carving workshop tradition — internal construction methods match period practice.
150 cm height represents significant material and labour investment, consistent with workshop production for temple or institutional settings.
Full documentation prepared by Stitt Gallery including photographic record and dimensional survey.
Technical Documentation
Full dimensional survey, elevation drawings, and iconographic reference prepared by Stitt Gallery. Front and side elevations with annotated specifications.
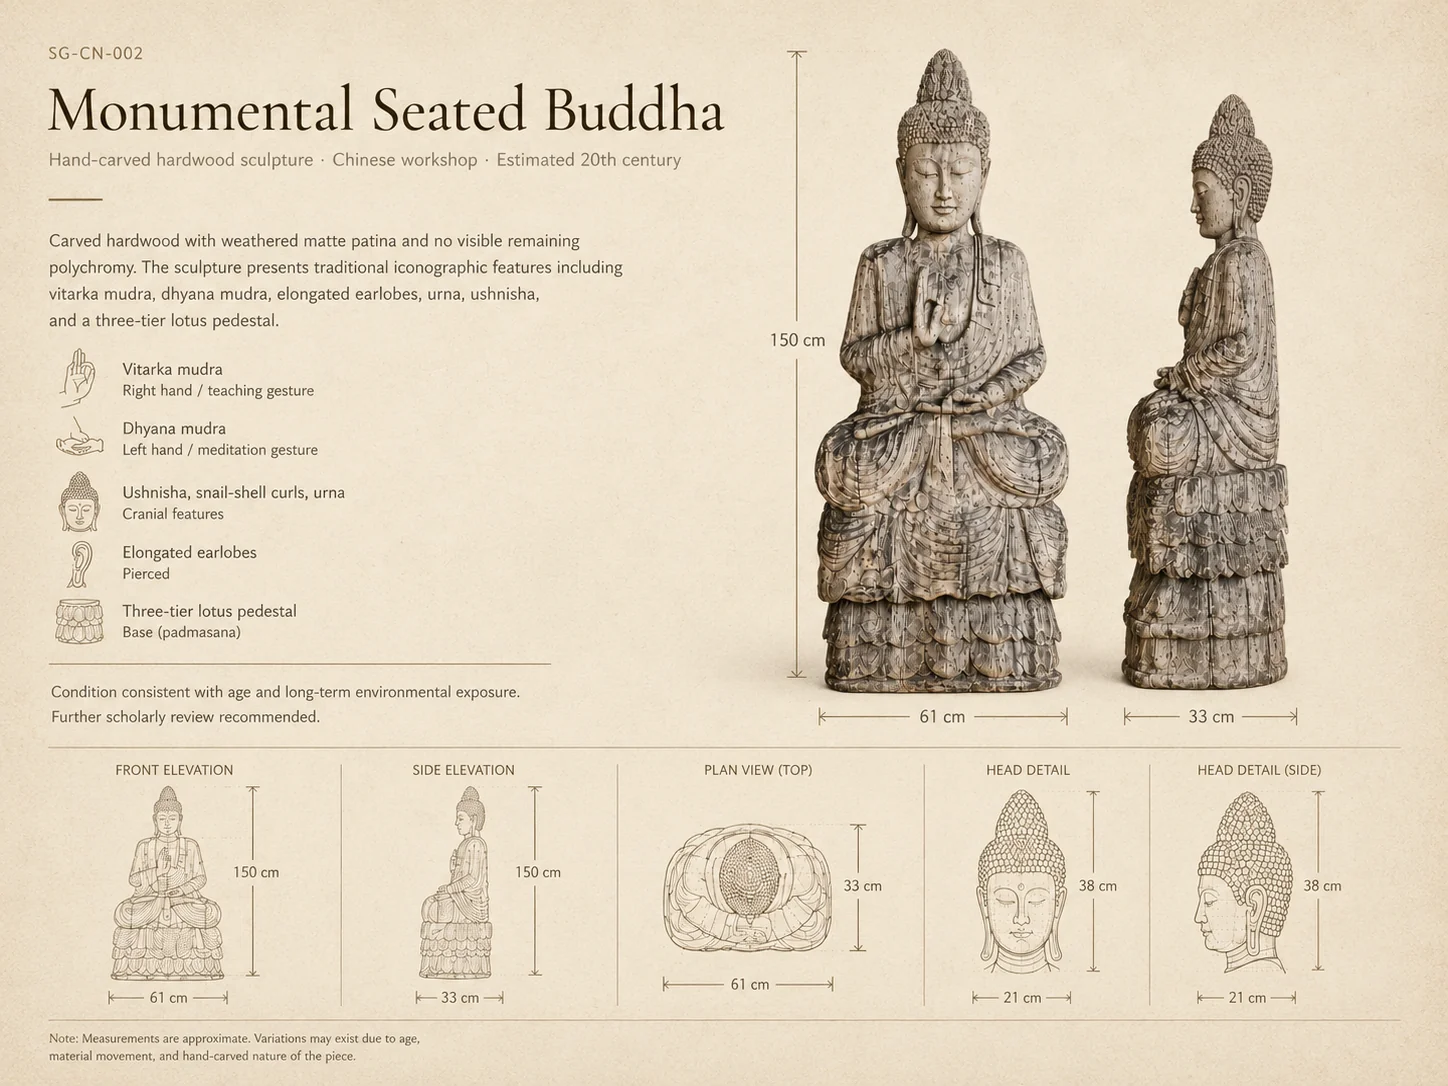
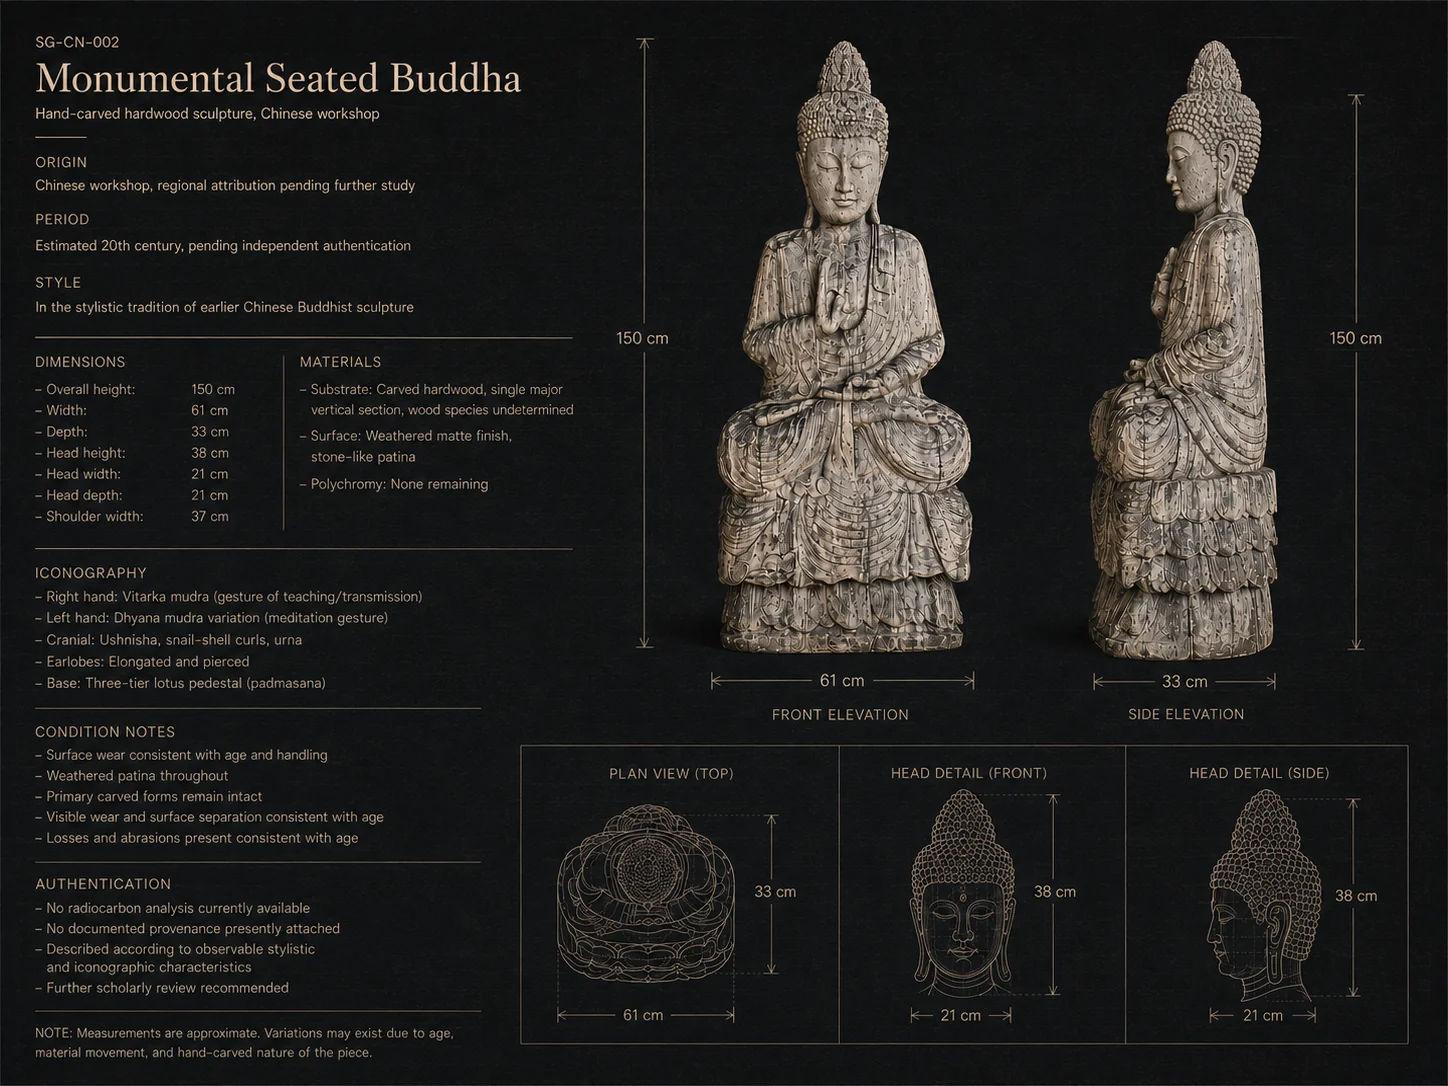
SG-CN-004 · Dimensional survey · Front and side elevations with annotated specifications
Acquisition
Stitt Gallery offers several pathways for acquiring this piece, each suited to different timelines, risk profiles, and cost structures. We are happy to discuss which approach best serves your circumstances.
Option 1
Direct purchase from Stitt Gallery. The simplest and fastest route — no auction fees, no uncertainty. Typical timeline 3–6 weeks from enquiry to delivery. Full documentation included.
Option 2
Placement through a specialist auction house with Asian art expertise. Suitable if you prefer market-tested pricing and are comfortable with the 15–25% buyer's premium and timing uncertainty.
Option 3
Placement through an established dealer or gallery specialising in Asian sculpture. Offers curated presentation and access to a qualified collector base. Dealer commission typically 20–30%.
Market Context
The market for 20th-century Chinese workshop Buddhist sculpture has shown consistent interest, with monumental-scale pieces (1.5 m+) commanding premiums over smaller examples. The following ranges are based on comparable transaction data from specialist auction houses and galleries (2019–2024), adjusted for scale, condition, and carving quality.
Conservative
€4,500 – 6,500
High ConfidenceBased on quick sale or auction reserve for comparable 20th-century Chinese workshop Buddhas in good condition.
Moderate
€6,500 – 8,500
Medium ConfidenceReflects direct private sale value with full documentation; this piece is offered at the top of this range.
Optimistic
€8,500 – 12,000
Lower ConfidenceAchievable through specialist Asian art dealers with extended marketing and provenance research.
€5,245
This piece is available for private sale. We welcome enquiries from collectors, interior specialists and institutions. Viewing by appointment in Poznań. Shipping to Europe and internationally arranged on request.
Secure online payment via Stripe · card · Google Pay
Gallery reference: SG-CN-004 · stittgallery.com
Continue Exploring